Hoy me tocó ayudar a un amigo con este ejercicio de programación, resulta que tenía que ingresar datos a una base de datos MySQL usando JavaScript, osea mediante un llamado AJAX (asíncrono) con un formulario. Entonces procedí a graficar la idea y a pasarle el siguiente ejemplo.
Lo principal es entender como es el flujo de la consulta, teniendo en cuenta que desde el HTML es lo que vemos en el navegador y JS es el lenguaje que se ejecuta en el navegador, nos está restando la forma en la que nos comunicamos con el servidor. En este caso utilizamos PHP como nuestro lenguaje backend (que se ejecuta en el servidor) para hacer la ejecución de la consulta SQL. Y como base de datos hacemos uso de MySQL, todo esto como un stack simple y que todos conocemos como LAMP o WAMP (Linux Apache MySQL y PHP o Windows Apache MySQL y PHP).
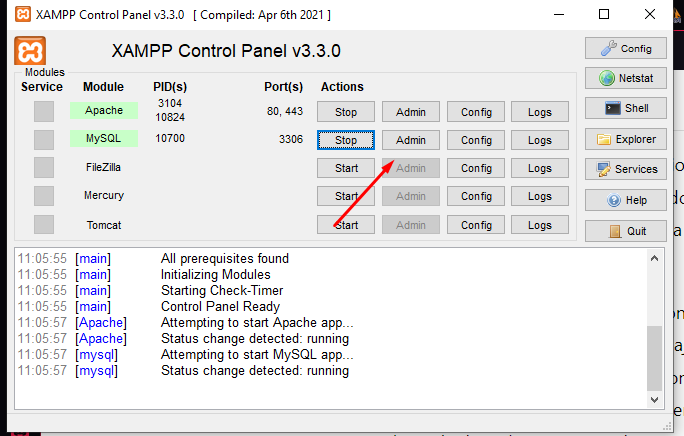
En mi caso para montar el servidor local utilicé XAMPP aunque en otros momentos de mi vida usaba AppServ, por alguna razón me terminé quedando con XAMPP que me resuelve con practicidad lo que requiero.
Antes que nada tengo que crear el esquema de la base de datos, entonces en este caso requiero crear una base de datos, ¿cómo lo hago? utilizando PHPMyAdmin al cual puedo ir directamente desde la interfaz de Xampp y desde donde puedo tener un control total de la base de datos, tablas, campos, etc.
Dentro del PHPMyAdmin, en este caso debo crear la base de datos, luego generar la tabla que usaremos y finalmente los campos que contendrá (o columnas). En este caso es un sistema de tickets, y tendrá 7 campos que son:
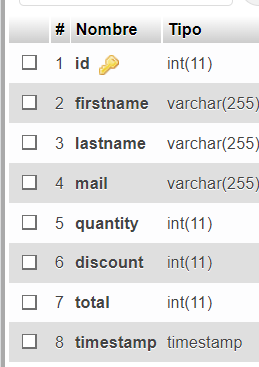
- ID (Identificador) * Es importante que tenga PRIMARY y AUTOINCREMENT
- firstname (Nombre)
- lastname (Apellido)
- mail (Correo electrónico)
- quantity (Cantidad)
- discount (Descuento)
- total (Precio final)
- timestamp (Fecha de carga)
Ya creados todos estos campos dentro de nuestra tabla de la base de datos, en mi caso le puse tickets a la tabla y a la base de datos le puse damian, (si, damián era la persona a la que estaba ayudando).
Ahora pasamos a crear nuestra estructura visual, realmente es básica y no agregué funciones visuales (validaciones o calculos del ticket) o estilos (diseño en formularios). Así que avancemos por cada archivo.
En el HTML generé una estructura básica, para quienes usen el abreviador emmet (super recomendado) es muy práctico, sólo escriban html:5 y la tecla tab y ya está (disponible en VSCODE y en SublimeText), y pasamos a lo siguiente: Generé el formulario con sus respectivos inputs y dentro de divs individuales sólo para que no me queden uno al lado de otro, también agregué un botón de submit.
<!DOCTYPE html>
<html lang="en">
<head>
    <meta charset="UTF-8">
    <meta http-equiv="X-UA-Compatible" content="IE=edge">
    <meta name="viewport" content="width=device-width, initial-scale=1.0">
    <title>Ticket Form</title>
</head>
<body>

    <!-- We create a form without action and method, because we going to send it by JS -->
    <form action="">
        <!-- Is important to put a name parameter inside the input -->
        <div><input id="firstname" name="firstname" placeholder="First Name" type="text"></div>
        <div><input id="lastname" name="lastname" placeholder="Last Name" type="text"></div>
        <div><input id="mail" name="mail" placeholder="Mail" type="text"></div>
        <div><input id="quantity" name="quantity" placeholder="Quantity" type="text"></div>
        <div><input id="discount" name="discount" placeholder="Discount" type="text"></div>
        <div><input id="total" name="total" placeholder="Total" type="disabled"></div>
        <!-- and then submit by a button (we gonna listen it in JS) -->
        <div><input type="submit" value="Submit"></div>
    </form>

    <!-- we load the JS -->
    <script src="./script.js"></script>
</body>
</html>
Los comentarios los dejo en inglés, no es el mejor inglés posible pero es una MUY BUENA PRÁCTICA usar inglés en todas nuestras tareas de programación, ya sea en nombres de variables, campos y en comentarios.
Luego avanzamos por nuestra parte de JavaScript, que sería donde tomariamos el formulario, escuchariamos el evento del submit y enviariamos mediante fetch (carga asíncrona) los datos para ser ingresados en la base de datos.
// first we create a function for the submitted form
function submitForm(){
    // we declare three variables
    // first selecting the form (beware of the selector, look down)
    let form = document.querySelector('form');
    // and then we get the FormData inside variable data
    let data = new FormData(form);

    // and we create an Object (or dict) with three parameters, method, body and headers
    let fetchData = {
        method: 'POST',
        body: data,
        headers: new Headers()
      }
    // now we use the function fetch for send a request to anotehr url, and we pass two parameters
    // the first parameter is the URL and the second one is an object called fetchData
    // we need to change the URL to our url for the insertDB
    fetch("http://localhost/clientes/damian/insertdb.php", fetchData)
        // then we get a result, we parse it as json (if is a json object)
        .then((resp) => resp.json())
        // and next we execute an inline function with the data of the response
        .then(function(data){

            // we made an alert with the data and log in console
            alert(data);
            console.log(data);
        })
}


// we select from the document using the function querySelector an element with the tagname FORM
// then we use addEventListener for listen to the event SUBMIT and we use a function for it
// we pass a parameter "e" for the event
// additionally if we got different forms, we have to set a class (. selector) or id (# selector)
// warning, look up for the another querySelector if you change it
document.querySelector("form").addEventListener("submit", function(e){
    //stop form from submitting using the EVENT
    e.preventDefault();
    // we execute the submitForm() function
    submitForm();


});
Ahora ya sólo nos queda hacer la parte de la base de datos, acá estamos llamando a un archivo llamado insertdb.php (por cierto, cambien la url para que sea la correcta sino nada de esto tendrá sentido), así que vamos con ese archivo.
En el archivo insertdb.php nosotros haremos varias cosas:
- Conectaremos a nuestra base de datos
- Obtendremos los parametros que JavaScript nos envía mediante POST
- Crearemos la consulta a la base de datos (el INSERT)
- Devolveremos el ID del registro que hemos creado
<?php

// we start the php document, this document going to be loaded by a fetch in JavaScript

$config = array(
    "db_host" => "localhost",
    "db_user" => "nuestrousuario",
    "db_pass" => "nuestrapassword",
    "db_name" => "damian"
);
// we set an array with the configuration data and then we print the data inside the OBJECT $db (of type mysqli) as parameters

$db = new mysqli($config['db_host'],$config['db_user'], $config['db_pass'], $config['db_name']);


// we set the HOSTNAME, the USER DB, the PASS of the user and the DATABASE NAME


// we check if there's any error number, we print it and exit, and if not, we are connected
if($db->connect_errno){

    printf("Error al intentar conectarse a la base de datos: %s\n", $db->connect_error);
    exit();

}else{
    // We are connected !


    // setting the variables with the data to insert in DB

    // we GET the variables from a POST parameters
    $firstname = $_POST["firstname"];
    $lastname = $_POST["lastname"];
    $mail = $_POST["mail"];
    $quantity = $_POST["quantity"];
    $discount = $_POST["discount"];
    $total = $_POST["total"];
    $timestamp = date("u");
    // firstname, lastname, mail, quantity, type, total, timestamp

    // $sql = sprintf("INSERT INTO tickets ('firstname', 'lastname', 'mail', 'quantity', 'discount', 'total', 'timestamp') VALUES ('%s', '%s', '%s', '%s', '%s', '%s', '%s')", $firstname, $lastname, $mail, $quantity, $discount, $total, $timestamp);

    // we create the SQL Query first, and inside the query we put the values
    $sql = "INSERT INTO tickets (firstname, lastname, mail, quantity, discount, total, timestamp) VALUES ('$firstname', '$lastname', '$mail', '$quantity', '$discount', '$total', '$timestamp')";
    //print_r($sql);


    // we execute the Query inside the $db object (of type MySQLi) and save it as a $result variable
    // if has a result, we continue
		if($result = $db->query($sql)){
            // we print the last insert id, this gonna be returned to JS in the fetch
			print $db->insert_id;
        }
}
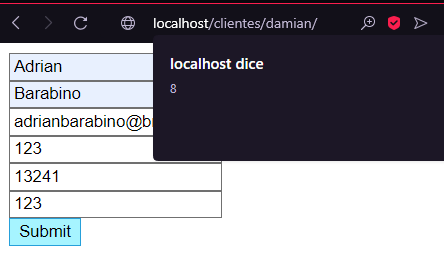
Si hicimos bien todo, nos debería funcionar correctamente y ya podríamos ingresar esos registros a nuestra base de datos. Es un ejemplo práctico y pensé que podría llegar a servir explicándolo por acá. Cualquier consulta pueden escribirla en los comentarios y sin problemas les respondo o ayudo. También les dejo mi mail adrianbarabino@brote.org
¡Saludos y suerte con aprender desarrollo web!
También te puede interesar
Más lecturas cerca de este destino o tema.
Deja un comentario